测试十三、Airtest-Selenium做Web自动化测试
本文最后更新于:2024年3月20日 中午
十三、airtest-selenium做Web自动化测试
1. 前言
Selenium是一个用于Web应用程序的自动化测试工具。它直接运行在浏览器中,可以模拟用户在浏览器上面的行为操作。
在AirtestIDE中,开发者也给我们提供了使用Selenium的窗口。不过使用的框架是airtest-selenium框架。airtest-selenium是对selenium的python库做的一层封装,它添加了部分图像识别的接口,也可以生成网页版测试报告 。
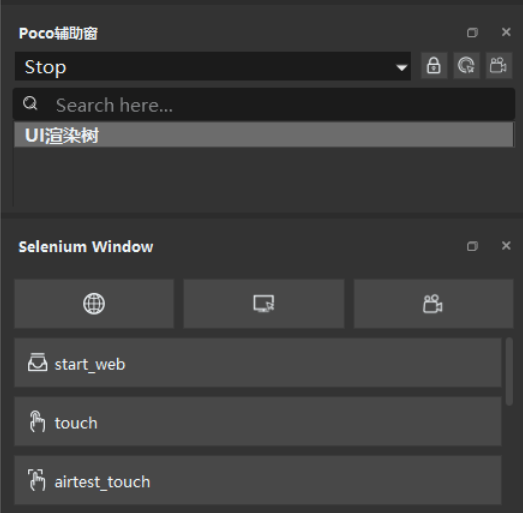
airtest_touch:图像点击assert_template:断言图像存在snapshot:给网页截图switch_to_previous_tab:切换到上一个打开的标签页switch_to_new_tab:切换到最新打开的标签页- ……
本文将借助AirtestIDE上的Selenium窗口,来给大家讲解在浏览器上进行自动化测试的实践。
2. selenium window功能介绍
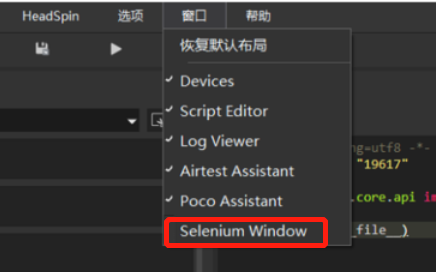
1)在AirtestIDE中调出Selenium的窗口
默认情况下,IDE没有并显示Selenium的窗口,所以我们需要在IDE顶部的窗口菜单下,把Selenium Window勾选上,勾选之后Selenium的窗口才会显示在IDE界面的左侧。
2)插入初始代码的快捷按钮
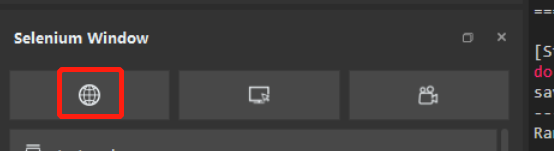
Selenium Window给我们提供了一些常用的按钮,比如点击窗口下类似地球的按钮,会自动帮我们在脚本编辑窗口插入一些初始化代码:
插入代码之前,我们需要在脚本窗口弹出的黄色提供框中,选择Yes允许插入代码:

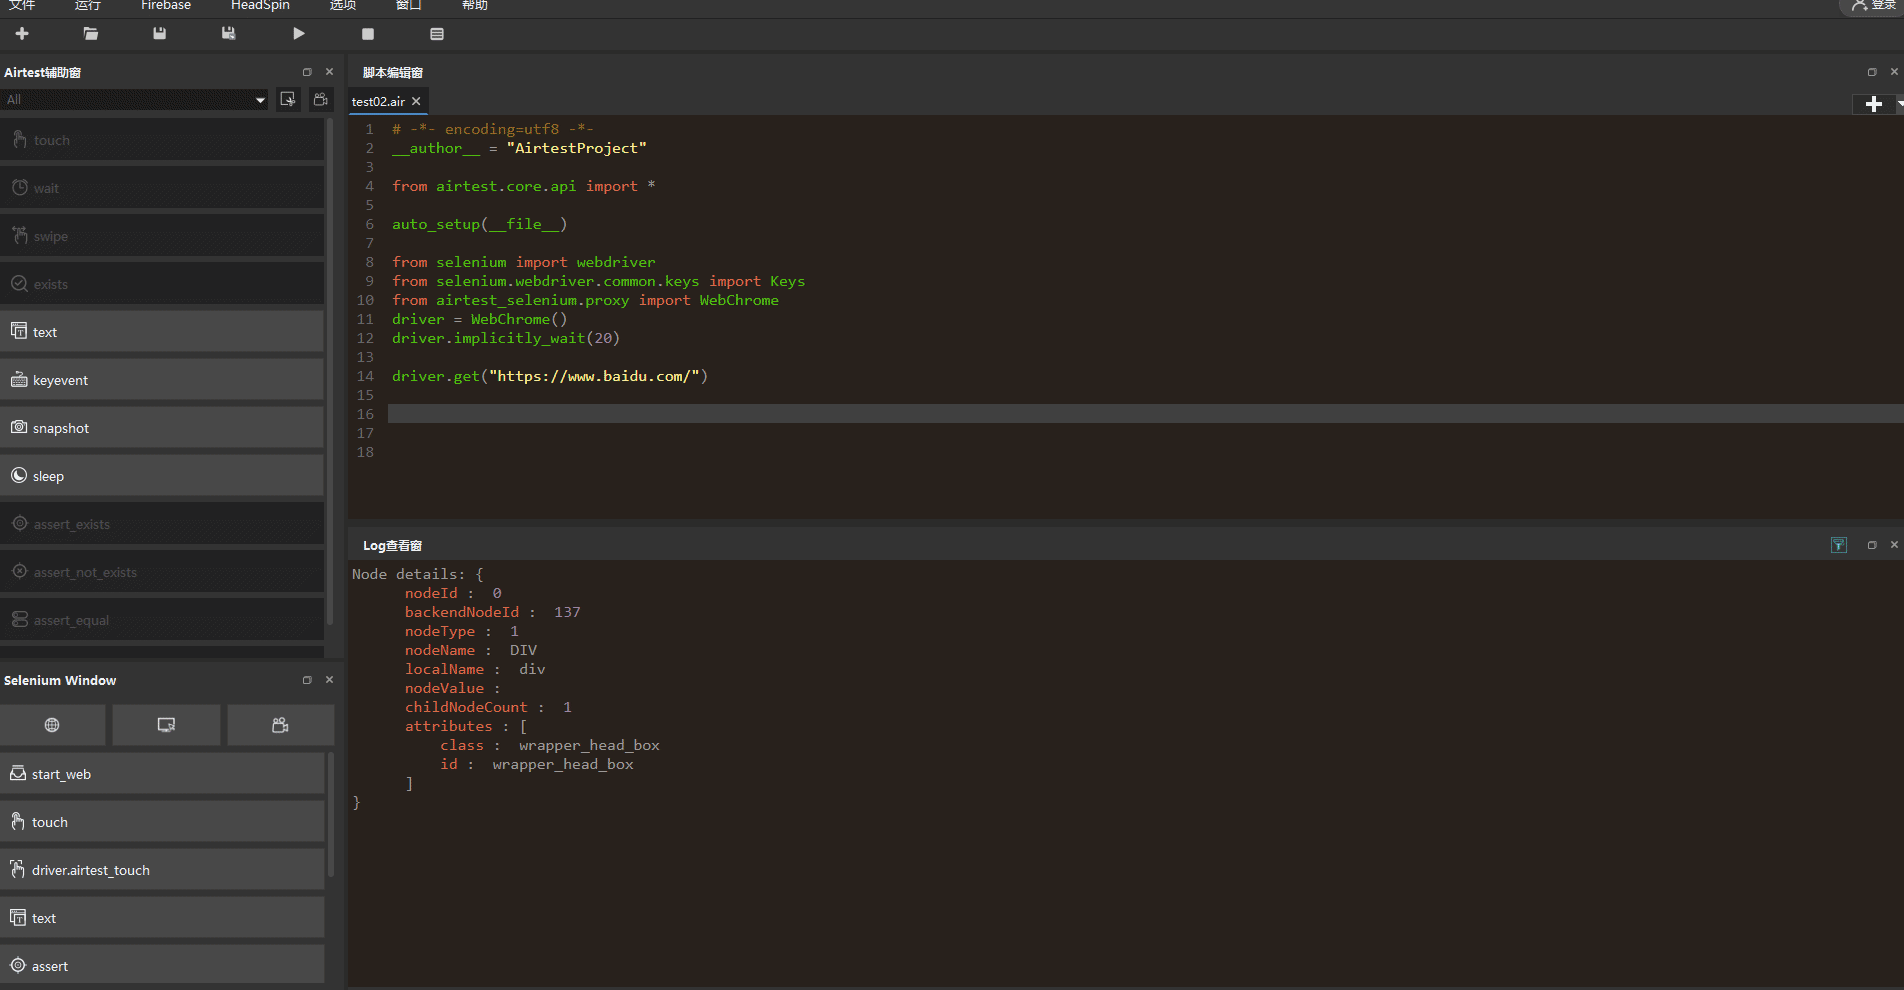
这样,脚本编辑窗就会自动插入如下代码:
1 | |
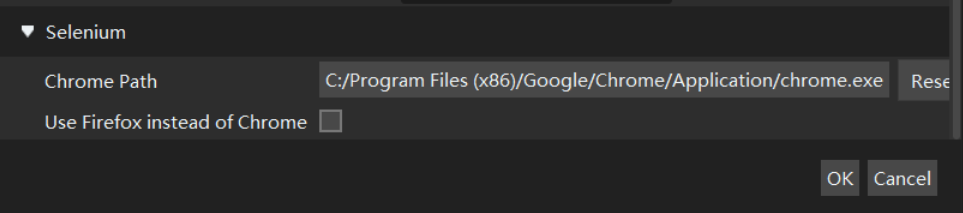
需要注意的是,如果是首次使用这个按钮,IDE会弹窗提示需要设置谷歌浏览器的路径:
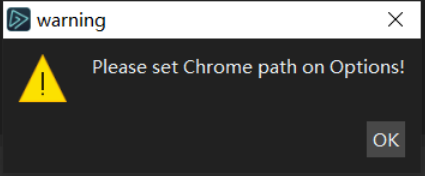
这时我们就需要先到选项--设置中,找到Selenium那部分内容,然后把chrome的路径设置好,才能正常插入上述代码。注意是chrome.exe的路径,不是chromedriver.exe的路径!!!
3)元素检索的快捷按钮
点击初始化快捷按钮,打开一个chrome窗口之后,我们可以点击selenium window提供的元素检索快捷按钮,帮助我们检索元素的详细信息,另外单击可以生成元素的定位脚本(xpath定位的方式):
4)脚本录制的快捷按钮
同样是点击初始化快捷按钮,打开一个chrome窗口之后,我们可以点击selenium window提供的脚本录制按钮,帮助我们快速生成Web自动化测试脚本:
录制完脚本之后,我们可以直接使用AirtestIDE的运行脚本和报告生成功能,一键回放脚本和生成报告(因无法录制打开百度网站的动作,所以我们手动添加了1条打开百度网站的脚本):

5)常用API的快捷按钮
除了上述3个功能之外,selenium window还给我们提供了一些常用API的快捷按钮,可以帮助我们更快熟悉这些常用的API,上手web自动化测试脚本:
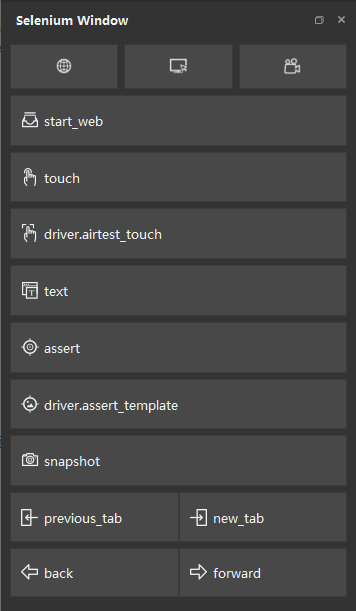
- start_Web:即
driver.get(""),打开指定网址 - touch:即
driver.find_element_by_xpath("").click(),标准selenium的元素点击 - driver.airtest_touch:即
driver.airtest_touch(Template(......)),airtest-selenium封装的图像点击 - text:即
driver.find_element_by_id("").send_keys(""),标准selenium的元素输入操作 - assert:即
driver.assert_exist("", "xpath", "请填写测试点."),标准selenium的元素存在断言 - driver.assert_template:即
driver.assert_template(Template(......), "请填写测试点"),airtest-selenium封装的图像存在断言 - snapshot:即
driver.snapshot(),airtest-selenium封装的页面截图操作 - previous_tab:即
driver.switch_to_previous_tab(),airtest-selnium封装的切换到上一个标签页的操作 - new_tab:即
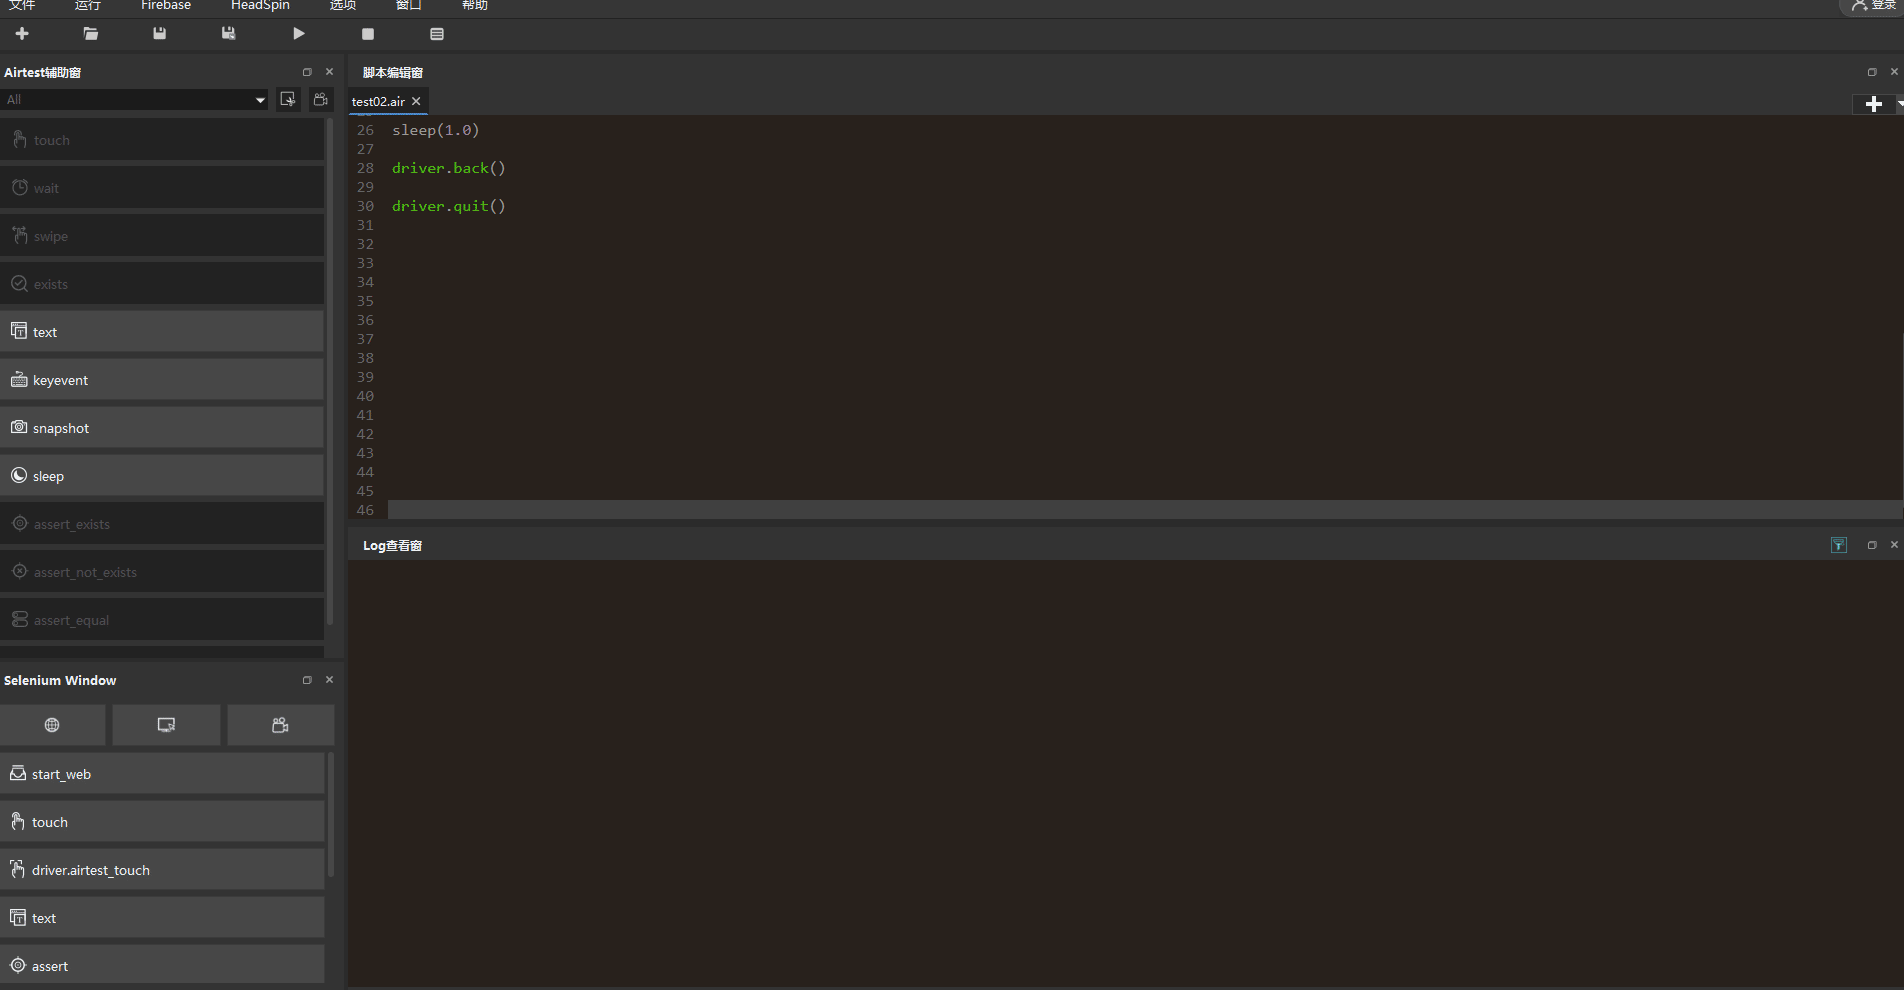
driver.switch_to_new_tab(),airtest-selenium封装的切换到新打开标签页的操作 - back:即
driver.back(),标准selenium的页面后退操作 - forword:即
driver.forward(),标准selenium的页面前进操作
3. airtest-selenium封装的接口介绍
1)图像识别接口
Airtest-Selenium对图像识别的封装有两个接口,图像识别点击和图像识别断言:
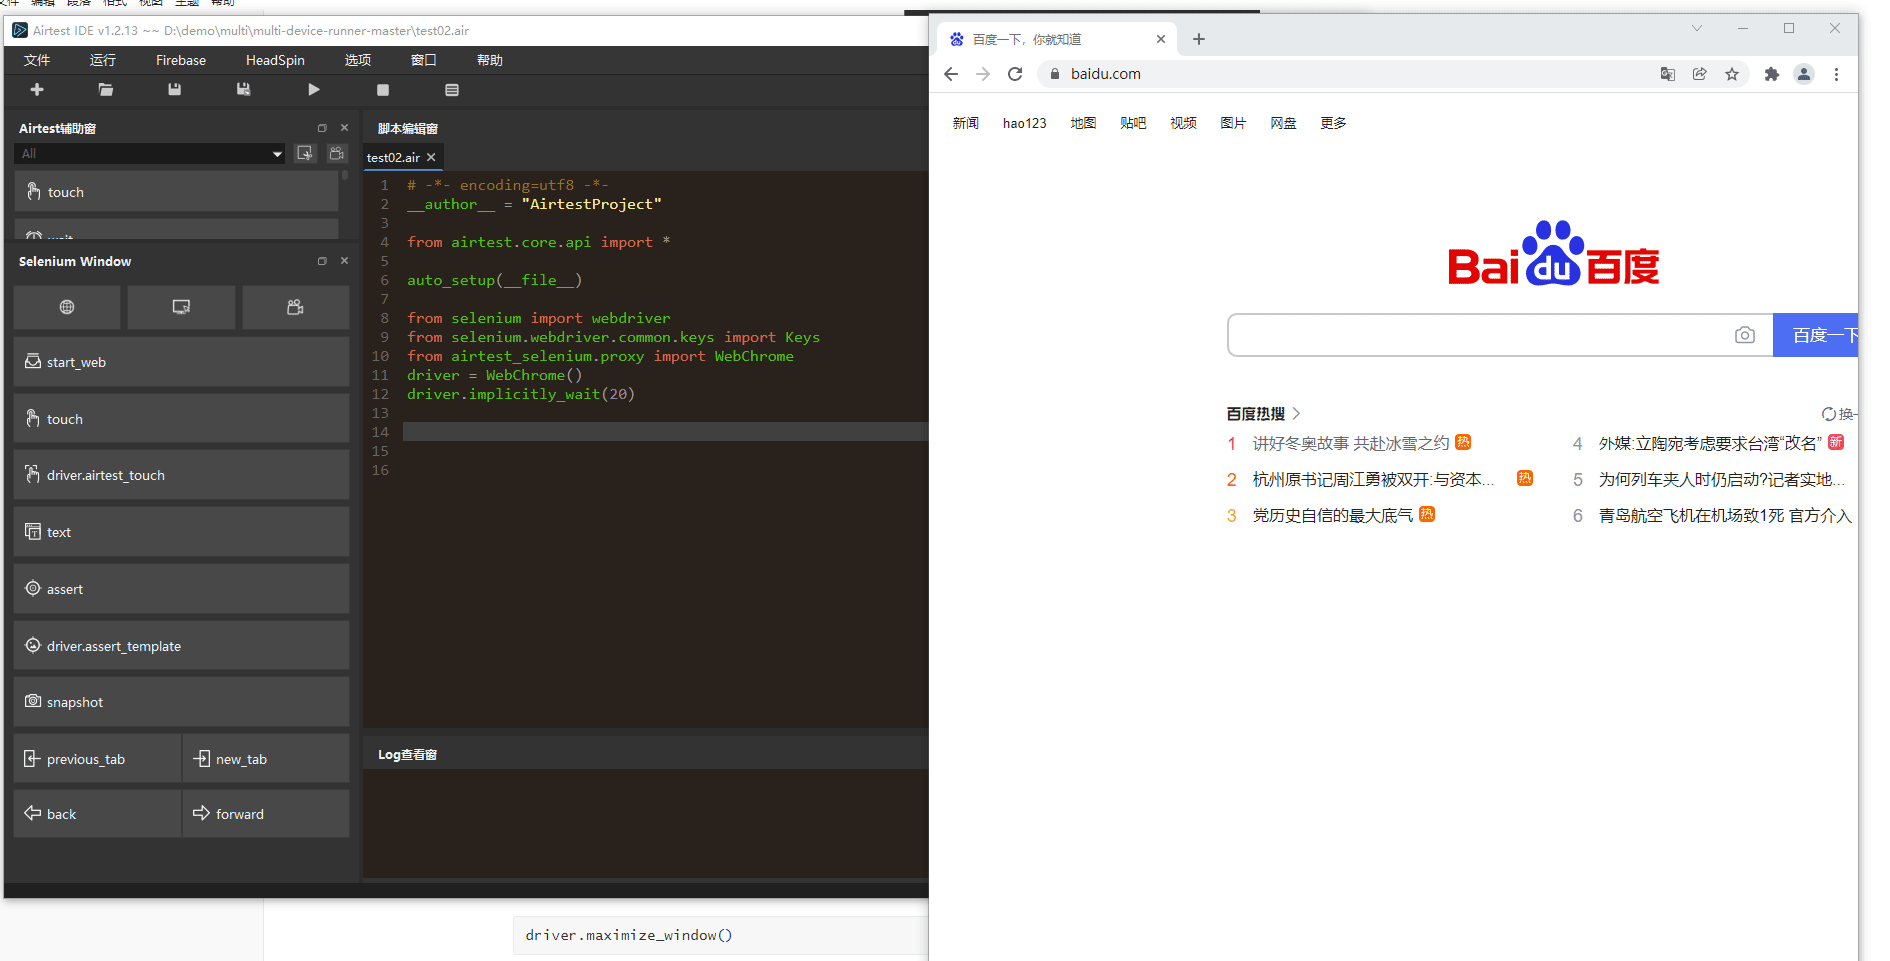
①点击Selenium Window下方的airtest_touch按钮
在浏览器页面上截取你想要点击位置的图片,拖拽后松开鼠标完成截图,脚本编辑窗口会自动生成1条图像识别点击的脚本

1 | |
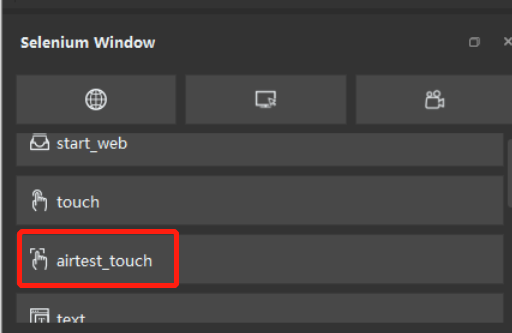
②点击Selenium Window下方的airtest_touch按钮
在浏览器页面上截取你想要进行断言的图片,拖拽后松开鼠标完成截图,脚本编辑窗口会自动生成1条图像识别断言脚本

1 | |
关于Selenium更多的断言实例,详看官方之前的推文“测试同学都应该知道的断言知识…” 。
值得注意的是,这两个接口是基于Airtest框架的图像识别封装,如果图像脚本运行时在网页中找不到对应图像,会抛出Target not found on screen的异常。
2)多标签页切换
selenium提供了切换标签页的接口。
1 | |
这个语句执行后,可以切换到第number个打开的标签页。但是对于用户来说,这个接口不是那么好理解与调用,因为这样需要记住标签打开的顺序。
而大部分时候,切换标签页的操作一般都出现在:打开新窗口、关闭标签页这两种情况下。因此,Airtset-Selenium封装了两个接口:
1 | |
在这个接口内部,Airtest-Selenium维护了标签页的组织结构。用户只需在切换到最新打开的标签页时,调用switch_to_new_tab。
另外在结束当前标签页时,切换到上一个打开的标签页时,调用switch_to_previous_tab()即可,不再需要去考虑当前是第几个这样之类的问题。
3)页面截图接口
airtest-selenium提供 snapshot 接口,可以给当前的web页面截图并保存在指定的本地路径下。
1 | |
4)封装API的报告
被Airtest-Selenium封装的接口,运行过后都会生成对应的报告,在AirtestIDE中可以直接点击生成报告按钮,即可查看对应的报告内容。
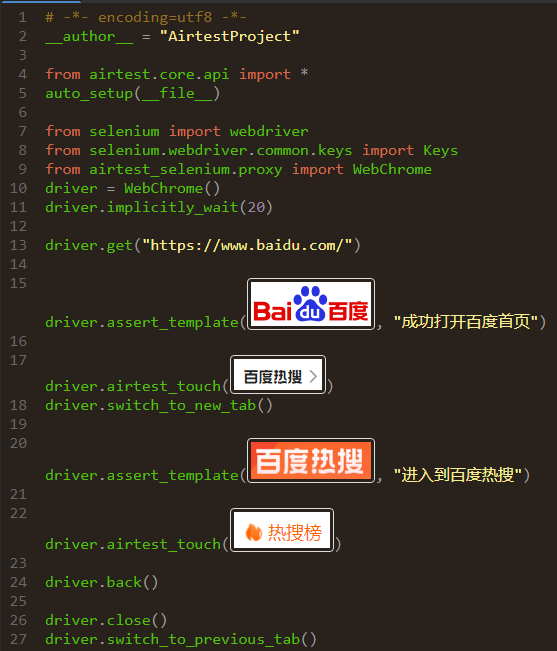
4. 在IDE进行web自动化的小实践
这个小实践可以完成以下事情:
- 打开一个新的chrome浏览器
- 进入百度首页
- 图像断言
- 图像点击
- 标签页切换
- 页面后退
- 关闭标签页
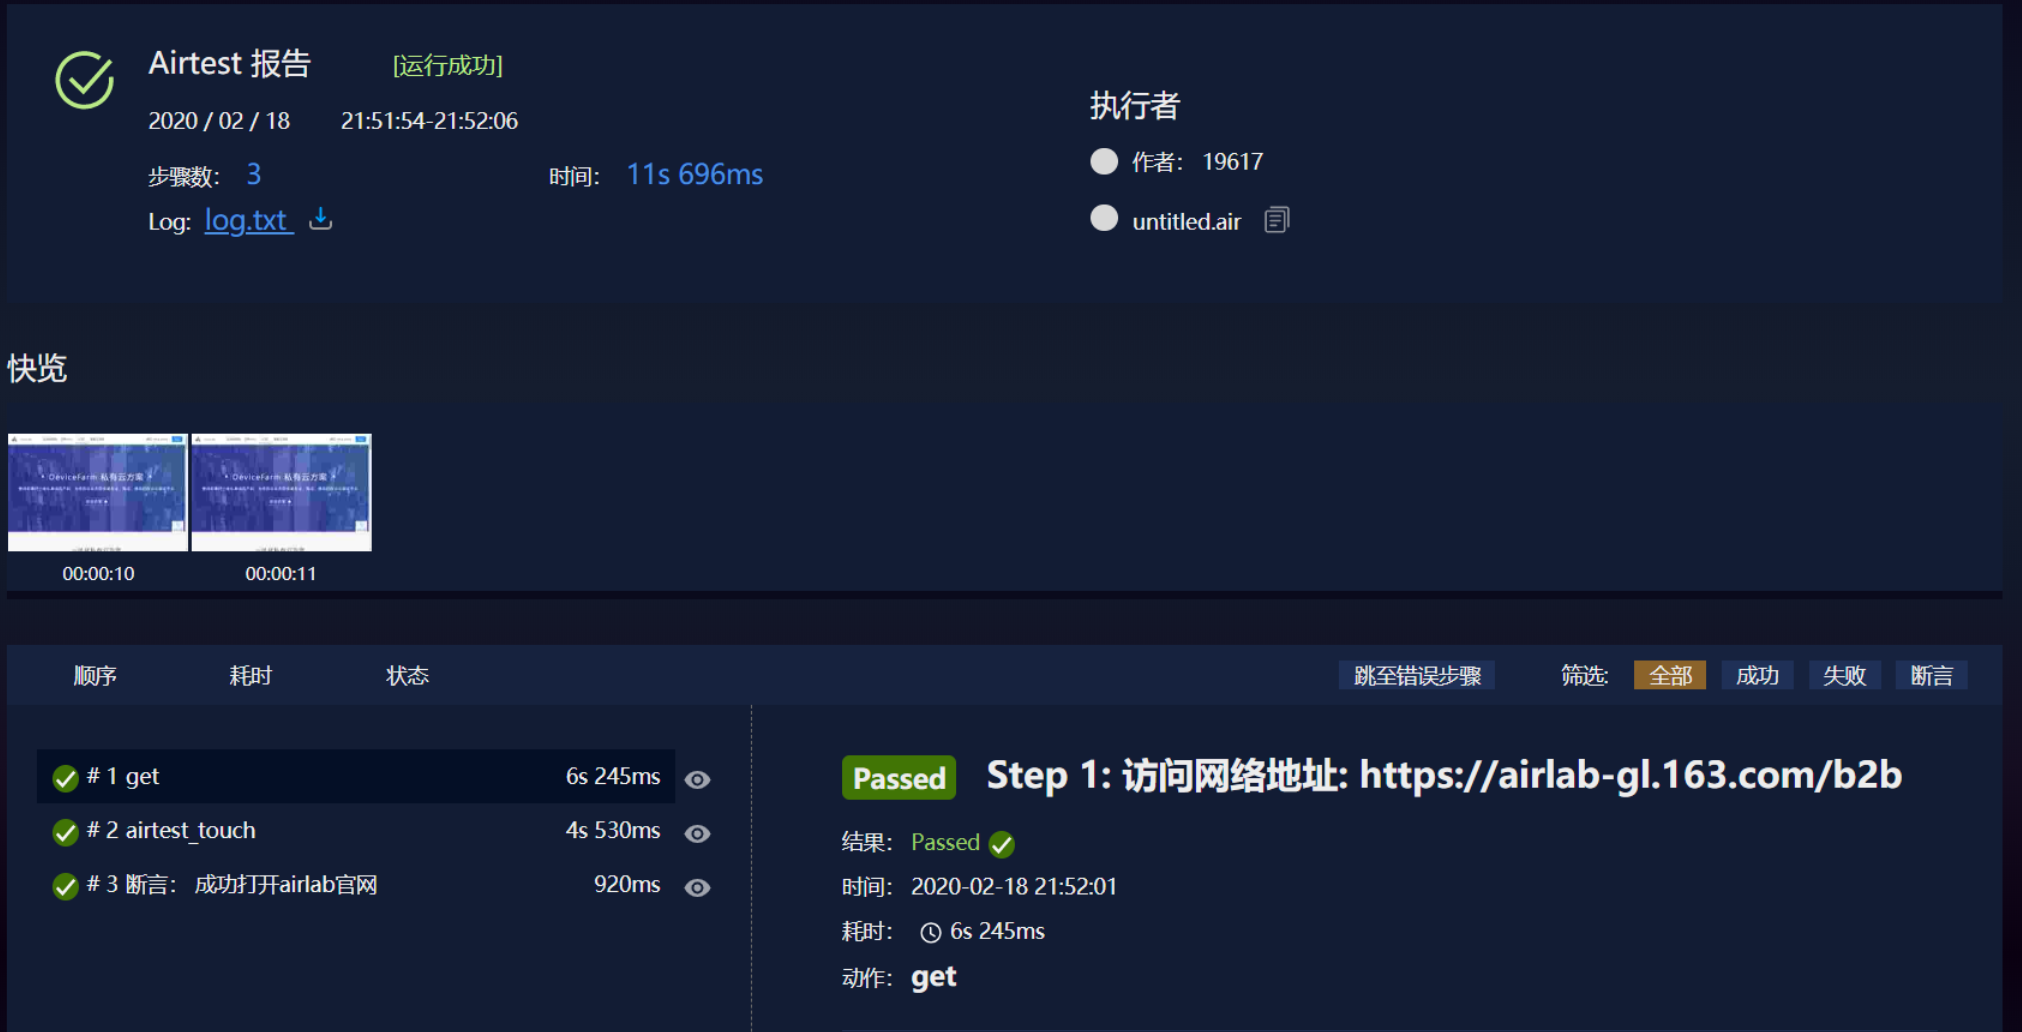
脚本运行效果:

报告查看:

5. 进行web自动化的常见问题
1)使用airtest-selenium封装的图像方法报错
有些同学在使用airtest-selenium封装的一些图像方法时,出现类似 name 'Template' is not defined 的报错:

通常是因为忘记/误删了引入Airtest库的方法,我们可以在脚本开头添加:
1 | |
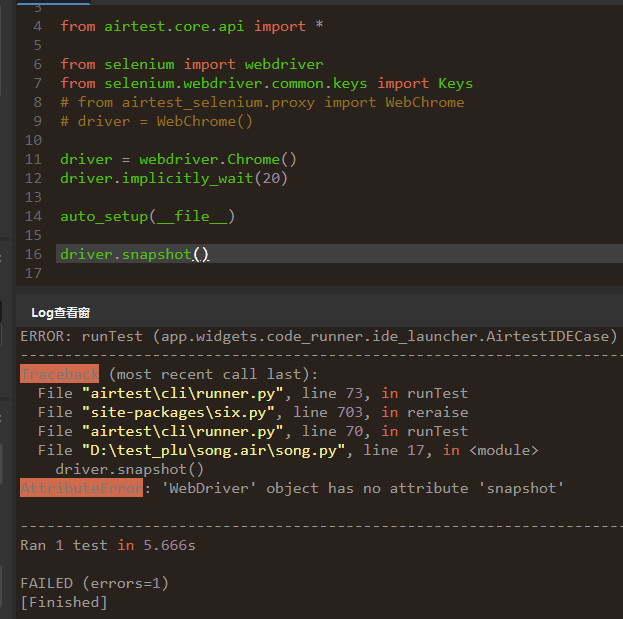
2)混淆airtest-selenium的WebChrome()和selenium的webdriver.Chrome()
在airtest-selenium库里,我们可以通过这样的方式实例化一个chrome对象:
1 | |
而在selenium库里,我们则是通过下述方式对chrome进行实例化的:
1 | |
如果我们要使用airtest-selenium封装的图像方法,像 airtest_touch、snapshot和assert_template等,我们就必须实例化airtest-selenium提供的 WebChrome 类。
否则会出现类似 AttributeError: 'WebDriver' object has no attribute 'snapshot' 的报错:
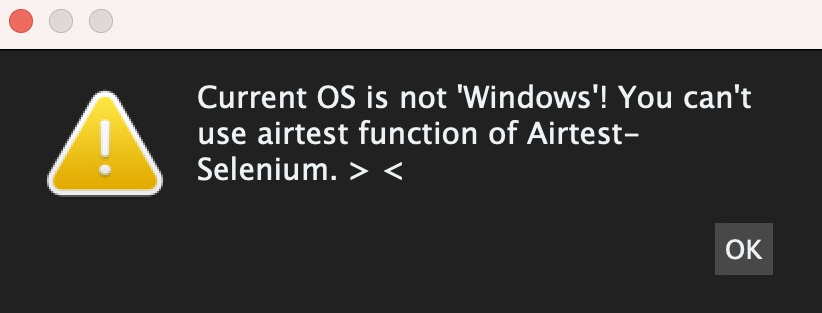
3)暂不支持在Mac上使用airtest-selenium
目前暂不支持在Mac上使用airtest-selenium,使用时我们也会弹出如下的提示:
1 | |
4)airtest-selenium报告插件
在生成airtest-selenium(Web自动化测试)的报告时,我们需要加载专用的报告插件。
如果我们使用AirtestIDE的 查看报告 按钮来生成,会自动帮我们加载这个插件:
1 | |

如果我们使用脚本生成测试报告,则需要手动指定 plugins 参数:
1 | |
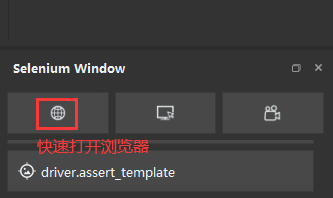
5)unknown error: cannot find Chrome binary
这是同学们在使用airtest-selenium进行Web测试 最常问 的一个问题了。通常情况是,我们在AirtestIDE的Selenium Window辅助窗中,点击打开浏览器的按钮,可以正常打开一个chrome浏览器的窗口(因为我们事先在选项-设置中设置了chrome.exe的路径):

但是在执行airtest-selenium脚本,运行到打开浏览器窗口的代码时,却会报类似下述的报错:
1 | |
如果我们的chrome浏览器是安装在默认路径下的(我们也非常建议将chrome浏览器安装到默认路径下,可以省去很多问题),出现上述报错时,我们需要检查以下2点:
- chrome浏览器匹配的驱动(chromedriver)有没有放在环境变量目录位置上
- chrome浏览器版本与驱动(chromedriver)版本是否匹配
如果没有放在正确目录下或者与现有浏览器版本不匹配,我们可以在查看安装好的chrome浏览器版本后,到这个路径下下载匹配的chromedriver:http://chromedriver.storage.googleapis.com/index.html 。
如果我们的chrome浏览器没有安装在默认路径下,也很有可能因为Selenium找不到二进制的chrome.exe文件而抛出上述的异常,通常我们可以选择以下方式来解决:
- 卸载已安装的chrome浏览器,然后重新安装到默认路径下
- 不重新安装的话,可以直接配置chrome浏览器的安装目录到环境变量中
当然我们也支持使用使用代码来指定chrome.exe或者chromedriver(2者的版本必须匹配)的路径:
1 | |
6)脱离AirtestIDE运行airtest-selenium脚本时未安装库
如果我们使用AirtestIDE自带的环境来运行Web自动化脚本,则直接运行即可,因为内嵌的python环境已经事先安装好了airtest-selenium库。
但是如果我们指定使用本地python环境或者脱离AirtestIDE运行Web自动化脚本,则需要我们在对应的python环境里安装好airtest-selenium库:
1 | |
否则会出现 no module named 'airtest_selenium' 的报错:

另外,也有些同学在安装这个库时,可能会出现 no module named 'pynput'的报错,此时我们需要先安装好 pynput 库,再来安装airtest-selenium:
1 | |
7)Web自动化的输入与键盘操作
与Android、iOS、Windows平台不一样的是,在Web自动化脚本中,我们并非使用 text 进行文本输入操作,也不是使用 keyevent 模拟键盘操作。
而是使用 send_keys,以下是一个简单的例子,我们打开百度首页后,定位到搜索文本输入框,输入一定的文本,然后执行键盘回车操作:
1 | |

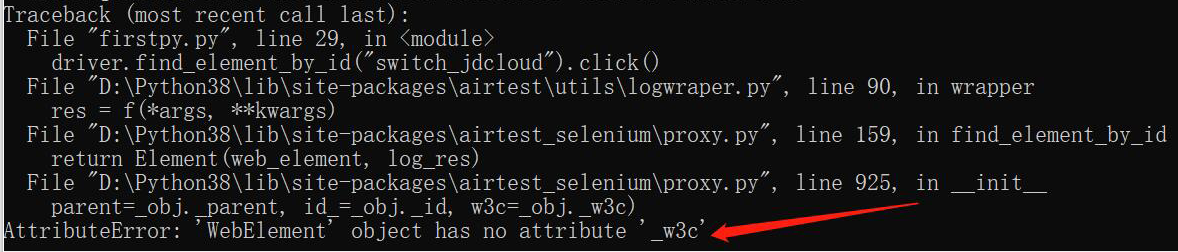
8)AttributeError: ‘WebElement’ object has no attribute ‘_w3c’
通常是因为使用了本地python环境,并且本地python环境安装了selenium4,因为目前我们还不兼容selenium4,所以请同学们卸载selenium4,安装selenium3的版本即可。
6. 拓展:selenium python学习资料
本博客所有文章除特别声明外,均采用 CC BY-SA 4.0 协议 ,转载请注明出处!